本文主要介绍Docker、Go、PostgreSQL如何修改它们的时区。

首先需要知道一些基础概念:

  1. Unix 时间戳 -是从1970年1月1日(UTC/GMT的午夜)开始所经过的秒数,不考虑闰秒。
  2. UTC –协调世界时,又称世界统一时间、世界标准时间、国际协调时间。
  3. CST–可视为中国、古巴的标准时间或美国、澳大利亚的中部时间。北京时间,也就是东八区时间。

Docker

Docker 作为部署和运行应用程序的环境,默认使用 UTC 作为其容器的时区,但我们可以通过设置环境变量来修改时区。

修改的方法

  1. 在 Dockerfile 中添加以下行:
ENV TZ=Asia/Shanghai
  1. 在 Kubernetes 中的 Pod 配置文件中,添加 env 字段,设置环境变量。Example:
spec:
  containers:
  - name: my-container
    image: my-image
    env:
      - name: TZ
        value: Asia/Shanghai
  1. 验证在容器中使用 env 命令查看环境变量,例如
env

输出会有key为TZ,value为Asia/Shanghai表示成功

TZ=Asia/Shanghai

Go

在 Go 中修改时区需要使用标准库中的 time 包。我们可以通过FixedZone来修改时区。 Example:

package main

import (
	"fmt"
	"time"
)

func main() {
	var utcZone = time.FixedZone("UTC", 0*3600) // UTC
	time.Local = utcZone
	utcNow := time.Now()
	utcDate := time.Date(utcNow.Year(), utcNow.Month(), utcNow.Day(), 0, 0, 0, 0, utcNow.Location())
	fmt.Printf("UTC time: %s\n", utcDate.String())
	fmt.Printf("UTC timestamp: %d\n", utcDate.Unix())

	var cstZone = time.FixedZone("CST", 8*3600) // 东八
	time.Local = cstZone
	cstNow := time.Now()
	cstDate := time.Date(cstNow.Year(), cstNow.Month(), cstNow.Day(), 0, 0, 0, 0, cstNow.Location())
	fmt.Printf("CST time: %s\n", cstDate.String())
	fmt.Printf("CST timestamp: %d\n", cstDate.Unix())
}
//output
//UTC time: 2023-02-25 00:00:00 +0000 UTC
//UTC timestamp: 1677283200
//CST time: 2023-02-25 00:00:00 +0800 CST
//CST timestamp: 1677254400

在上面的代码中,我们使用time.FixedZone分别设置UTC、上海时区,并获取当天零点的时间戳 _date。

PostgreSQL

在PostgreSQL系统内部,所有日期和时间都用全球统一时间UTC格式存储, 时间在发给客户前端前由数据库服务器根据TimeZone 配置参数声明的时区转换成本地时间

在 PostgreSQL 中,我们可以通过修改 postgresql.conf 文件来修改时区。 以下是如何在 Docker运行 PostgreSQL 中修改时区的步骤:

  1. 拷贝dockers中的 postgresql.conf到宿主主机
sudo docker cp [your_docker_contariner_id]:/var/lib/postgresql/data/postgresql.conf /[your_work_space]/
  1. 修改配置
sudo vi /[your_work_space]/postgresql.conf

查找替换timezone为上海时区

timezone = 'Asia/Shanghai'

可以通过sql查找支持的时区:

select * from pg_timezone_names;
  1. 保存并覆盖dockers中配置
sudo docker cp /[your_work_space]/postgresql.conf [your_docker_contariner_id]:/var/lib/postgresql/data/
  1. 重新容器
sudo docker restart [your_docker_contariner_id

现在,你的 PostgreSQL 数据库就使用了正确的时区。

  1. 检查是否设置成功 通过sql获取设置:
select * from pg_db_role_setting;

也可以查看数据库中表字段格式为TimestampTZ,Example 修改前

2023-02-25 00:00:00 +0000 +00

修改后台

2023-02-25 08:00:00 +0000 +08

以上。

参考

上一篇(传送门)介绍了测试平台 locust + boomer 的环境搭建,以及运行http压测用例,观测性能指数、图表。这篇接上篇,继续讲go boomer如何实现。

setup

Install the master branch

$ go get github.com/myzhan/boomer

Install a tagged version that works with locust 1.6.0

$ go get github.com/myzhan/boomer@v1.6.0

install gomq

$ go get -u github.com/zeromq/gomq

quick start

run master

创建python文件 workspace/dummy.py

from locust import Locust, TaskSet, task
class MyTaskSet(TaskSet):
    @task(20)
    def hello(self):
        pass
class Dummy(Locust):
    task_set = MyTaskSet

运行:

$ locust –master -f dummy.py output:

$locust.main: Starting web interface at http://0.0.0.0:8089 (accepting connections from all network interfaces)
$locust.main: Starting Locust 2.9.1.dev23
run slave

创建go文件 workspace/main.go

package main

import(
	"fmt"
	"io/ioutil"
	"net/http"
	"time"
	"github.com/myzhan/boomer"
)

func helloTask() {
	start := time.Now()
	err := HttpGet("hello")
	elapsed := time.Since(start)
	if err != nil {
		boomer.RecordFailure("http", "world", elapsed.Nanoseconds()/int64(time.Millisecond), err.Error())
		return
	}
    
/*    Report your test result as a success, if you write it in locust, it will looks like this    events.request_success.fire(request_type="http", name="world", response_time=100, response_length=10)    */
	boomer.RecordSuccess("http", "world", elapsed.Nanoseconds()/int64(time.Millisecond), int64(10))
}

func worldTask() {
	start := time.Now()
	err := HttpGet("world")
	elapsed := time.Since(start)
	if err != nil {
		boomer.RecordFailure("udp", "world", elapsed.Nanoseconds()/int64(time.Millisecond), err.Error())
		return
	} 
/*  Report your test result as a failure, if you write it in locust, it will looks like this    events.request_failure.fire(request_type="udp", name="hello", response_time=100, exception=Exception("udp error"))    */
	boomer.RecordSuccess("udp", "world", elapsed.Nanoseconds()/int64(time.Millisecond), int64(10))
}

func main() {
	task1 := &boomer.Task{
		// 同时跑多个 tasks 的时候,Weight 字段用于分配 goroutines
		Weight: 10,
		Fn:     helloTask,
	}

	task2 := &boomer.Task{
		Weight: 10,
		Fn:     worldTask,
	}

	// 连接到 master,等待页面上下发指令,支持多个 Task
	boomer.Run(task1, task2)
}


func HttpGet(path string) error {
	url := fmt.Sprintf("http://localhost:8090/%s", path)
	method := "GET"

	client := &http.Client{}
	req, err := http.NewRequest(method, url, nil)

	if err != nil {
		fmt.Println(err)
		return err
	}
	res, err := client.Do(req)
	if err != nil {
		fmt.Println(err)
		return err
	}
	defer res.Body.Close()

	body, err := ioutil.ReadAll(res.Body)
	if err != nil {
		fmt.Println(err)
		return err
	}
	fmt.Println(string(body))
	return nil
}


go run main.go

output

$ Boomer is built with gomq support.
$ Boomer is connected to master(tcp://127.0.0.1:5557) press Ctrl+c to quit.

说明启动slave成功,查看是否连接上master

$ locust.runners: Client 'crazyMac.local_axxbyy123456' reported as ready. Currently 1 clients ready to swarm.

说明已经连接上master 。

testing

启动测试,output

succeed

小结

本文主要介绍了如何利用go boomer 实现locust的通讯协议,以及使用boomer实现一个上一篇的http压测例子。

reference

最近公司打算对后端服务进行压力测试,考虑后端的主要使用golang实现,因此作者准备使用 locust + boomer 实现一个性能测试平台,mark一下实现过程。

what is locust

Locust 是一种易于使用、可编写脚本且可扩展的性能测试工具。 您可以在常规 Python 代码中定义用户的行为,而不是停留在 UI 或限制性特定领域的语言中。

what is boomer

boomer 完整地实现了 locust 的通讯协议,运行在 slave 模式下,用 goroutine 来执行用户提供的测试函数,然后将测试结果上报给运行在 master 模式下的 locust。

与 locust 原生的实现相比,解决了两个问题。 一是单台施压机上,能充分利用多个 CPU 核心来施压, 二是再也不用提防阻塞 IO 操作导致 gevent 阻塞。

环境

  • 服务器
    • Ubuntu (2核4G300G)
  • 压测机
    • Mac
    • Python 版本 Python 3.10.2
    • Go 版本 go version go1.17.1 darwin/arm64

压测机

安装 locust

  1. 安装python3.7或者版本大于3.7 (mac 自带python2.X版本)
brew install python

查看安装版本

# python3 -V
Python 3.10.2
  1. Install Locust
# pip3 install locust
  1. 检查安装是否成功
# locust -V
locust 2.9.1.dev23

运行 locust: hello-world

要把大象放冰箱一共分三步:第一步打开冰箱–,不不不,第一步:先试试把小象(hello-world)看看能不能放的进去

在当前目录 workspace/ 底下创建 locustfile.py

from locust import HttpUser, task
class HelloWorldUser(HttpUser):
    @task
    def hello_world(self):
        self.client.get("/hello")
        self.client.get("/world")
启动 locust
 # locust
 locust 
$: Starting web interface at http://0.0.0.0:8089 (accepting connections from all network interfaces)
$: Starting Locust 2.9.1.dev23

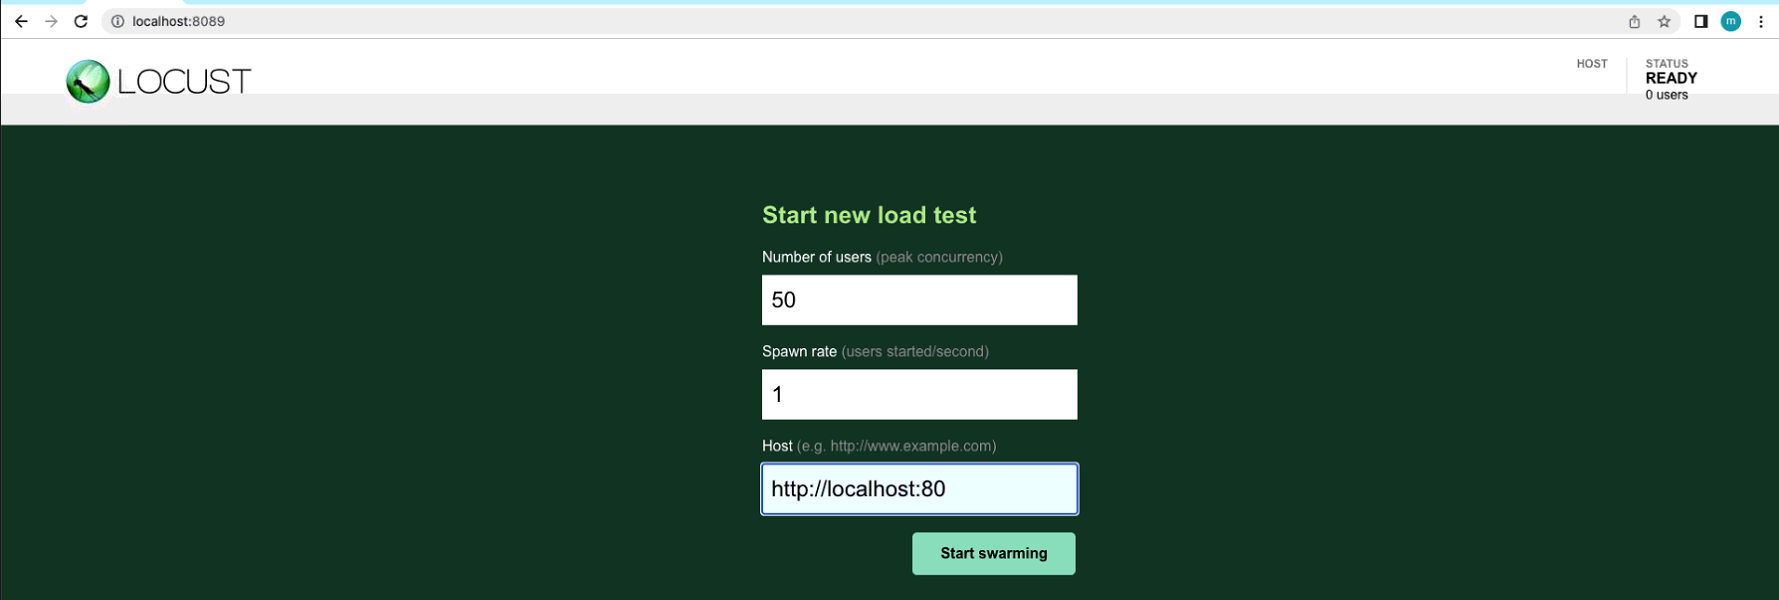
访问 http://localhost:8089/ 可以看到

接着,这边使用golang启动一个http服务 localhost:80(path:/hello & /world)

locust - HelloWorld

进行一个简单测试 50 个并发用户,加速速度为 1个用户/秒,将其指向响应/hello和的服务器/world

点击 “start swarming”

切换标签页 “Charts” 可以查看:显示每秒请求数 (RPS)

查看:响应时间(以毫秒为单位)

查看: 用户数量

小结

本文主要介绍性能测试平台 locust + boomer 的环境搭建,以及运行http 测试用例helloworld,使用locust观测性能指数、图表等。

参考

jefffff

Stay hungry. Stay Foolish COOL

Go backend developer

China Amoy